📚 LAB 1 CMPE1250: GPIO and UART
📋 Overview
-
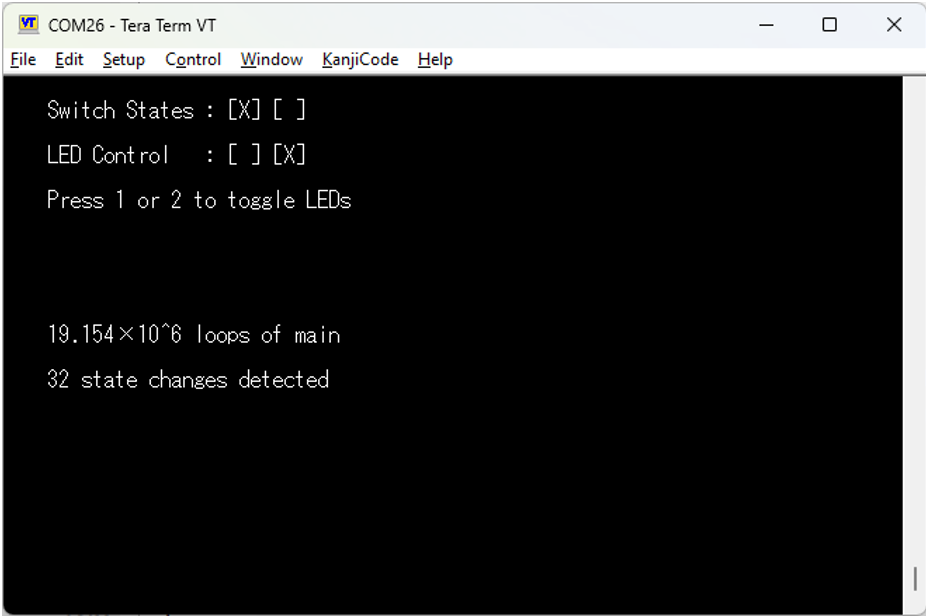
In this lab you will combine what you have learned to create an embedded application that renders the state of buttons and LEDs on the terminal. The terminal will be used to control the state of the LEDs.
-
You will need one of the button/LED PCBs provided in class for this exercise, at least six F/F jumper wires, and of course, the Nucleo board.
-
You will need to wire up 3.3V and GND to the I/O board VCC and GND pins respectively (in the middle set of pins of the I/O board).
-
You will additionally need to wire up at least two LEDs (D1 and D2 on the I/O board), and at least two switches (S1 and S2 on the I/O board).
-
Connect
S1 and S2 to PD8 and PD9 respectively, and connectD1 and D2 to PC4 and PC5 respectively. -
Your program will initialize the UART and clear the terminal initially, and then render all static output to the terminal. You will not redraw any redundant or static information to the terminal in this application.

1️⃣ Main Program Loop:
In the main program loop you will:
-
Check the state of the switches and render their state to the terminal as shown above. A switch that is pressed will render as an X in the box at the ordinal position for that s from the terminal. You may ignore all other characters.
-
The boxes for the LEDs will indicate an X if the LED is currently on. NOTE: The LEDs are active low, so some inverting of the logic is required here.
-
Do not update any output to the terminal if there has been no change in state for the switches or LEDs since the last loop iteration.
-
Remember that focus needs to be on the terminal application in order to transmit characters to the micro!
2️⃣ Design Requirements
- Because we want the assignment of our GPIO pins to be flexible and self-documenting, you will use a structure to describe each pin assignment in this exercise. Use the following structure definition in your code for this purpose
typedef struct
{
  int pin_number;           // the pin number used for this item
  GPIO_TypeDef * pin_port; // the port the pin is on for this item
} PIN_ASSIGNMENT;
You may then make global constants that describe each pin assignment in your application:
  const PIN_ASSIGNMENT LED_A = {4, GPIOC};     // D1
  const PIN_ASSIGNMENT LED_B = {5, GPIOC};    // D2
  const PIN_ASSIGNMENT SWITCH_A = {8, GPIOD};  // S1
  const PIN_ASSIGNMENT SWITCH_B = {9, GPIOD};  // S2
-
All of your code will use these pin assignments for all operations. You may assume in your code that a LED pin assignment will be used as an output, and a switch pin assignment will be used as an input.
-
Remember that for a structure instance, and not a pointer to struct, we use the direct member operator to access members. For example, the line of code that would configure the pin mode would look something like this:
  GPIO_InitInput(SWITCH_A.pin_port, SWITCH_A.pin_number);
  GPIO_InitInput(SWITCH_B.pin_port, SWITCH_B.pin_number);
  GPIO_InitOutput(LED_A.pin_port, LED_A.pin_number);
  GPIO_InitOutput(LED_B.pin_port, LED_B.pin_number);
- Remove all redundant rendering activity - only update the terminal if something has changed state.
3️⃣ Application-Specific Enhancing Functions
-
You will create functions to assess and render the output for the LEDs and switches. These are application-specific functions so they need to be prototyped above main, and defined below main. These functions will only be rendering a single character per LED/switch (a space to erase an X, or X to erase a space). You will need to use cursor positioning to avoid redrawing static output in the application.
-
Add an additional LED and an additional switch to your application (optional).
-
Add a counter that shows how many loops of main have been executed in engineering notation. This will be updated no more than once per second.
-
Add another counter that shows how many times the state of the switches has changed since the program started. This will be updated every time a change in switch state is detected.